Hướng dẫn cài đặt Ubuntu server
- Thứ sáu - 18/10/2019 16:57
- In ra
- Đóng cửa sổ này
Lưu lại các phần hướng dẫn cài ubuntu server
1. Tạo USB Cài Ubuntu với Rufus
+ Bước 1: Đầu tiền tải về Rufus tại trang chủ https://rufus.ie, hoặc tải theo link tự phòng (bản 3.5 như bài hướng dẫn)
+ Bước 2: Bạn nên sử dụng bản Rufus Portable để đỡ phải cài đặt khi sử dụng & bạn hãy chuẩn bị một chiếc USB có dung lượng tối thiểu là 4GB nhé.
Thực hiện: Bạn mở phần mềm lên và cắm chiếc USB vào máy tính. Bạn thiết lập các tùy chọn như trong hình bên dưới => rồi kích vào Start để bắt đầu tạo USB cài Ubuntu.
2. Cài Giao Diện Đồ Họa Trên Ubuntu Server
sudo apt-get update
sudo apt-get install lxde
3. Cài đặt VNC Server
Đăng nhập ssh để cài đặt VNC (Cài 1 lần dùng mãi) - Dùng Terminal của HĐH Linux hoặc dùng Windows thì có thể dùng Putty hoặc Bitvise SSH Client
sudo apt-get update
sudo apt-get install tightvncserver
vncserver :1 -geometry 1024x600 -depth 16 -pixelformat rgb565
vncserver :1
để chạy thông số mặc định thôi.
Chi tiet co hon tai day
4. Cài đặt xampp for ubuntu
wget https://www.apachefriends.org/xampp-files/7.3.10/xampp-linux-x64-7.3.10-0-installer.run
chmod 755 xampp-linux-x64-7.3.10-0-installer.run
sudo ./xampp-linux-x64-7.3.10-0-installer.run
sau khi cài xong thì có thể khởi động xampp bằng control xampp hoặc lệnh
$ sudo /opt/lampp/lampp start
Việc sử dụng phpmyadmin qua mạng Lan thì cần cấu hình lại file "httpd-xampp.conf".
If you see below error message, when try into phpyAdmin:
New XAMPP security concept:
Access to the requested directory is only available from the local network.
This setting can be configured in the file "httpd-xampp.conf".
You can do next (for XAMPP, deployed on the UNIX-system): You can try change configuration for <Directory "/opt/lampp/phpmyadmin">
# vi /opt/lampp/etc/extra/httpd-xampp.conf
and change security settings to
<Directory "/opt/lampp/phpmyadmin">
AllowOverride AuthConfig Limit
Order allow,deny
Allow from all
Require all granted
ErrorDocument 403 /error/XAMPP_FORBIDDEN.html.var
</Directory>
First - comment pl module, second - change config for node Directory. After it, you should restart httpd daemon
# /opt/lampp/xampp restart
Now you can access http://[server_ip]/phpmyadmin/
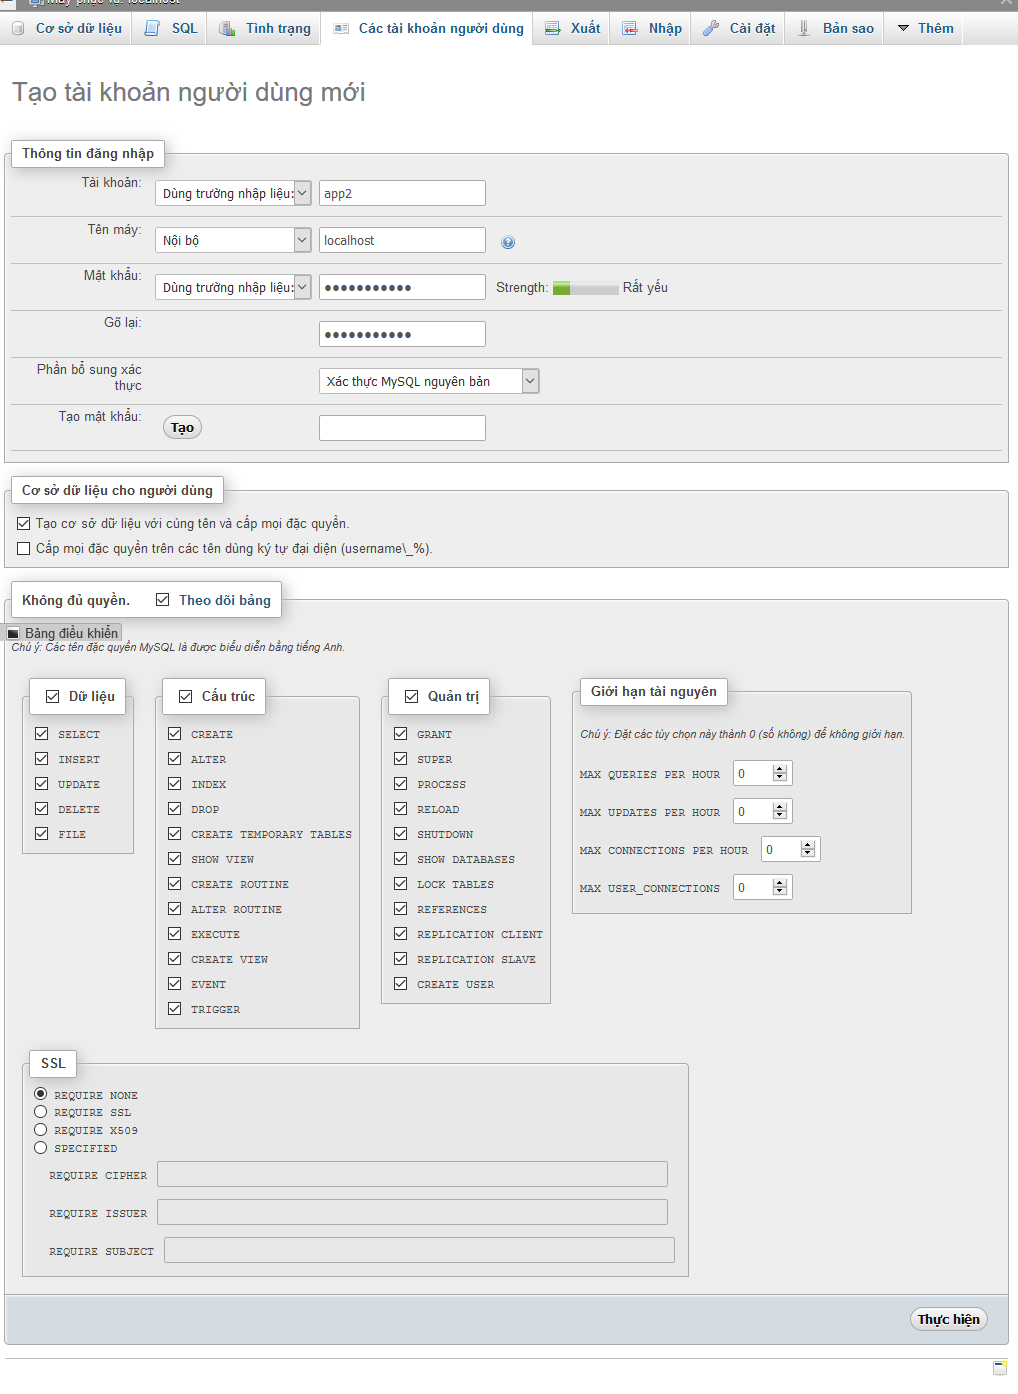
5. Thêm tài khoản mysql cho hệ thống có thể làm theo hình ảnh dưới
Cài website lên hosting thì cần phải chmod thư mục.
sudo chmod -R 777 /opt/lampp/htdocs/app1
Step 4: Config XAMPP run to VirtualHost
a. Edit file: /opt/lampp/etc/httpd.conf (để chạy được virtual hosts hãy xóa dấu # ở đầu dòng )
#Include etc/extra/httpd-vhosts.conf
to
Include etc/extra/httpd-vhosts.conf
b. Edit file: etc/extra/httpd-vhosts.conf
To:
<VirtualHost *:80>
ServerAdmin saurom1205@gmail.com
DocumentRoot "/opt/lampp/htdocs/minhduc"
ServerName minhduc.com
ServerAlias http://www.minhduc.com
ErrorLog "/opt/lampp/htdocs/minhduc/logs/error_log.log"
CustomLog "/opt/lampp/htdocs/minhduc/logs/access.log" common
</VirtualHost>
c. sua lai file /etc/hosts
127.0.0.1 localhost mypc
127.0.0.1 minhduc.com
Tăng giới hạn upload file trên Xampp for linux
sudo chmod -R 777 /opt/lampp/etc/php.ini
rùi sửa file
CHÚ Ý:
để sửa được file thì cần chmod 777 cho file đó
sudo chmod -R 777 /opt/lampp/etc/httpd.conf
sau khi sửa xong thì
sudo chmod -R 755 /opt/lampp/etc/httpd.conf
và
sudo chmod -R 777 /opt/lampp/etc/extra/httpd-vhosts.conf
sau khi sửa xong thì
sudo chmod -R 755 /opt/lampp/etc/extra/httpd-vhosts.conf
và
sudo chmod 777 /etc/hosts
sau khi sửa xong thì
sudo chmod 755 /etc/hosts
Cùng 1 tên miền mà chạy nhiều ứng dụng khác nhau.
Theo cách trên, ứng với mỗi project, chúng ta sẽ có một đường dẫn tương ứng:
http://localhost/myproject/hello-world.php
http://localhost/project_a/hello-world.php
http://localhost/project_b/hello-world.php
Cách sử dụng trên sẽ trở nên dài vì có thêm tên project, hoặc sẽ trở nên bất tiện nếu chúng ta sử dụng đường dẫn root có dạng /myproject/include/file.php.
Để giải quyết vấn đề trên, chúng ta sẽ cấu hình XAMPP sao cho có thể chạy được nhiều domain ngắn gọn hơn và có thể dùng root path tiện lợi hơn, khi này thay vì viết như trên, chúng ta có thể sử dụng đường dẫn như sau:
http://localhost:81/hello-world.php
http://localhost:82/hello-world.php
http://localhost:83/hello-world.php
Chúng ta cũng có thể sử dụng cách này để cấu hình chạy nhiều domain trong cùng một server.
Thêm port cho XAMPP: httpd.conf
Khi file httpd.conf đã được mở, tìm tới dòng #Listen 12.34.56.78:80, bạn sẽ thấy đoạn code bên trong có dạng như sau:
#Listen 12.34.56.78:80
Listen 80
Port 80 là port mặc định chạy http://localhost/ của XAMPP.
Từ vị trí này ta thêm nhiều port khác nhau, save lại sau mỗi lần thêm port:
#Listen 12.34.56.78:80
Listen 80
Listen 81
Listen 82
Listen 83
##<VirtualHost *:80>
##ServerAdmin webmaster@dummy-host.example.com
##DocumentRoot "C:/xampp/htdocs/dummy-host.example.com"
##ServerName dummy-host.example.com
##ServerAlias www.dummy-host.example.com
##ErrorLog "logs/dummy-host.example.com-error.log"
##CustomLog "logs/dummy-host.example.com-access.log" common
##</VirtualHost>
Bên dưới đoạn code mẫu này ta thêm đoạn code cấu hình sau:
<VirtualHost *:82>
DocumentRoot "C:/xampp/htdocs/myproject"
ServerName myproject.hwc
ServerAlias www.myproject.hwc
ErrorLog "C:/xampp/apache/logs/myproject.hwc-error.log"
CustomLog "C:/xampp/apache/logs/myproject.hwc-access.log"
<Directory "C:/xampp/htdocs/myproject">
Order Allow,Deny
Allow from all
</Directory>
</VirtualHost>
<VirtualHost *:82> : Đây là một trong những port đã được thêm vào httpd.conf, nếu cấu hình chạy domain thì chúng ta có thể dùng port 80.
DocumentRoot Thư mục chứa project (khai báo bắt buộc).
ServerName Tên server, dùng tên domain và port nếu có (khai báo bắt buộc).
ServerAlias Tên thay thế cho tên server (khai báo tùy chọn).
ErrorLog Đường dẫn tới file log error, sẽ xem lỗi từ đây (khai báo tùy chọn).
CustomLog Đường dẫn tới file log Uri khi người dùng request (khai báo tùy chọn).
Directory Bên trong tag này dùng để cấp quyền cho thư mục.
d. Restart xampp: /opt/lampp/lampp restart
Step5: Auto start , stop XAMPP FOR LINUX PUPPY
Edit file: /etc/rc.d/rc.local
--> Add line:
code:
if [ -x /opt/lampp/lampp ]; then
/opt/lampp/lampp start
fi
Edit file: /etc/rc.d/rc.local_shutdown
---> Add line:
if [ -x /opt/lampp/lampp ]; then
/opt/lampp/lampp stop
fi
Step 6: Uninstall
To uninstall XAMPP just type in this command:
rm -rf /opt/lampp
The end.
Auto Start XAMPP at Startup in Ubuntu Linux
( Chi tiết )
Tạo file /etc/systemd/system/xampp.service
sudo touch /etc/systemd/system/xampp.service
sudo systemctl enable xampp.service
sudo systemctl status xampp.service
Tham khao them cach 2 tai day
DDNS update for Doman myq-see.com
+ Bước 1: Đầu tiền tải về Rufus tại trang chủ https://rufus.ie, hoặc tải theo link tự phòng (bản 3.5 như bài hướng dẫn)
+ Bước 2: Bạn nên sử dụng bản Rufus Portable để đỡ phải cài đặt khi sử dụng & bạn hãy chuẩn bị một chiếc USB có dung lượng tối thiểu là 4GB nhé.
Thực hiện: Bạn mở phần mềm lên và cắm chiếc USB vào máy tính. Bạn thiết lập các tùy chọn như trong hình bên dưới => rồi kích vào Start để bắt đầu tạo USB cài Ubuntu.
2. Cài Giao Diện Đồ Họa Trên Ubuntu Server
sudo apt-get update
sudo apt-get install lxde
3. Cài đặt VNC Server
Đăng nhập ssh để cài đặt VNC (Cài 1 lần dùng mãi) - Dùng Terminal của HĐH Linux hoặc dùng Windows thì có thể dùng Putty hoặc Bitvise SSH Client
sudo apt-get update
sudo apt-get install tightvncserver
vncserver :1 -geometry 1024x600 -depth 16 -pixelformat rgb565
vncserver :1
để chạy thông số mặc định thôi.
Chi tiet co hon tai day
4. Cài đặt xampp for ubuntu
wget https://www.apachefriends.org/xampp-files/7.3.10/xampp-linux-x64-7.3.10-0-installer.run
chmod 755 xampp-linux-x64-7.3.10-0-installer.run
sudo ./xampp-linux-x64-7.3.10-0-installer.run
sau khi cài xong thì có thể khởi động xampp bằng control xampp hoặc lệnh
$ sudo /opt/lampp/lampp start
Việc sử dụng phpmyadmin qua mạng Lan thì cần cấu hình lại file "httpd-xampp.conf".
If you see below error message, when try into phpyAdmin:
New XAMPP security concept:
Access to the requested directory is only available from the local network.
This setting can be configured in the file "httpd-xampp.conf".
You can do next (for XAMPP, deployed on the UNIX-system): You can try change configuration for <Directory "/opt/lampp/phpmyadmin">
# vi /opt/lampp/etc/extra/httpd-xampp.conf
and change security settings to
<Directory "/opt/lampp/phpmyadmin">
AllowOverride AuthConfig Limit
Order allow,deny
Allow from all
Require all granted
ErrorDocument 403 /error/XAMPP_FORBIDDEN.html.var
</Directory>
First - comment pl module, second - change config for node Directory. After it, you should restart httpd daemon
# /opt/lampp/xampp restart
Now you can access http://[server_ip]/phpmyadmin/
5. Thêm tài khoản mysql cho hệ thống có thể làm theo hình ảnh dưới
Cài website lên hosting thì cần phải chmod thư mục.
sudo chmod -R 777 /opt/lampp/htdocs/app1
Step 4: Config XAMPP run to VirtualHost
a. Edit file: /opt/lampp/etc/httpd.conf (để chạy được virtual hosts hãy xóa dấu # ở đầu dòng )
#Include etc/extra/httpd-vhosts.conf
to
Include etc/extra/httpd-vhosts.conf
b. Edit file: etc/extra/httpd-vhosts.conf
To:
<VirtualHost *:80>
ServerAdmin saurom1205@gmail.com
DocumentRoot "/opt/lampp/htdocs/minhduc"
ServerName minhduc.com
ServerAlias http://www.minhduc.com
ErrorLog "/opt/lampp/htdocs/minhduc/logs/error_log.log"
CustomLog "/opt/lampp/htdocs/minhduc/logs/access.log" common
</VirtualHost>
c. sua lai file /etc/hosts
127.0.0.1 localhost mypc
127.0.0.1 minhduc.com
Tăng giới hạn upload file trên Xampp for linux
sudo chmod -R 777 /opt/lampp/etc/php.ini
rùi sửa file
post_max_size = 200M
upload_max_filesize = 200M
max_execution_time = 3000
max_input_time = 3000
memory_limit = 200M
Do mặc định PHP cho time-out là 30 giây. Nếu bạn cho phép người dùng upload 10M, thì bạn phải chỉnh file cấu hình cho thời gian time-out tăng lên.
Sau khi cấu hình xong nhớ khởi động lại server để hệ thống cập nhật lại.
CHÚ Ý:
để sửa được file thì cần chmod 777 cho file đó
sudo chmod -R 777 /opt/lampp/etc/httpd.conf
sau khi sửa xong thì
sudo chmod -R 755 /opt/lampp/etc/httpd.conf
và
sudo chmod -R 777 /opt/lampp/etc/extra/httpd-vhosts.conf
sau khi sửa xong thì
sudo chmod -R 755 /opt/lampp/etc/extra/httpd-vhosts.conf
và
sudo chmod 777 /etc/hosts
sau khi sửa xong thì
sudo chmod 755 /etc/hosts
Cùng 1 tên miền mà chạy nhiều ứng dụng khác nhau.
Theo cách trên, ứng với mỗi project, chúng ta sẽ có một đường dẫn tương ứng:
http://localhost/myproject/hello-world.php
http://localhost/project_a/hello-world.php
http://localhost/project_b/hello-world.php
Cách sử dụng trên sẽ trở nên dài vì có thêm tên project, hoặc sẽ trở nên bất tiện nếu chúng ta sử dụng đường dẫn root có dạng /myproject/include/file.php.
Để giải quyết vấn đề trên, chúng ta sẽ cấu hình XAMPP sao cho có thể chạy được nhiều domain ngắn gọn hơn và có thể dùng root path tiện lợi hơn, khi này thay vì viết như trên, chúng ta có thể sử dụng đường dẫn như sau:
http://localhost:81/hello-world.php
http://localhost:82/hello-world.php
http://localhost:83/hello-world.php
Chúng ta cũng có thể sử dụng cách này để cấu hình chạy nhiều domain trong cùng một server.
Thêm port cho XAMPP: httpd.conf
Khi file httpd.conf đã được mở, tìm tới dòng #Listen 12.34.56.78:80, bạn sẽ thấy đoạn code bên trong có dạng như sau:
#Listen 12.34.56.78:80
Listen 80
Port 80 là port mặc định chạy http://localhost/ của XAMPP.
Từ vị trí này ta thêm nhiều port khác nhau, save lại sau mỗi lần thêm port:
#Listen 12.34.56.78:80
Listen 80
Listen 81
Listen 82
Listen 83
##<VirtualHost *:80>
##ServerAdmin webmaster@dummy-host.example.com
##DocumentRoot "C:/xampp/htdocs/dummy-host.example.com"
##ServerName dummy-host.example.com
##ServerAlias www.dummy-host.example.com
##ErrorLog "logs/dummy-host.example.com-error.log"
##CustomLog "logs/dummy-host.example.com-access.log" common
##</VirtualHost>
Bên dưới đoạn code mẫu này ta thêm đoạn code cấu hình sau:
<VirtualHost *:82>
DocumentRoot "C:/xampp/htdocs/myproject"
ServerName myproject.hwc
ServerAlias www.myproject.hwc
ErrorLog "C:/xampp/apache/logs/myproject.hwc-error.log"
CustomLog "C:/xampp/apache/logs/myproject.hwc-access.log"
<Directory "C:/xampp/htdocs/myproject">
Order Allow,Deny
Allow from all
</Directory>
</VirtualHost>
<VirtualHost *:82> : Đây là một trong những port đã được thêm vào httpd.conf, nếu cấu hình chạy domain thì chúng ta có thể dùng port 80.
DocumentRoot Thư mục chứa project (khai báo bắt buộc).
ServerName Tên server, dùng tên domain và port nếu có (khai báo bắt buộc).
ServerAlias Tên thay thế cho tên server (khai báo tùy chọn).
ErrorLog Đường dẫn tới file log error, sẽ xem lỗi từ đây (khai báo tùy chọn).
CustomLog Đường dẫn tới file log Uri khi người dùng request (khai báo tùy chọn).
Directory Bên trong tag này dùng để cấp quyền cho thư mục.
d. Restart xampp: /opt/lampp/lampp restart
Step5: Auto start , stop XAMPP FOR LINUX PUPPY
Edit file: /etc/rc.d/rc.local
--> Add line:
code:
if [ -x /opt/lampp/lampp ]; then
/opt/lampp/lampp start
fi
Edit file: /etc/rc.d/rc.local_shutdown
---> Add line:
if [ -x /opt/lampp/lampp ]; then
/opt/lampp/lampp stop
fi
Step 6: Uninstall
To uninstall XAMPP just type in this command:
rm -rf /opt/lampp
The end.
Auto Start XAMPP at Startup in Ubuntu Linux
( Chi tiết )
Tạo file /etc/systemd/system/xampp.service
sudo touch /etc/systemd/system/xampp.service
In the opened file, add the following lines and save the file.
[Unit]
Description=XAMPP

[Service]
ExecStart=/opt/lampp/lampp start
ExecStop=/opt/lampp/lampp stop
Type=forking

[Install]
WantedBy=multi-user.target
After reboot, open the terminal and run the following command.
sudo systemctl status xampp.service
Tham khao them cach 2 tai day
DDNS update for Doman myq-see.com
Microsoft Windows Update Clients
Our native DDNS update client for Windows.
MintClient.zip
Linux/Unix Update Clients
DDCLIENT v3.9.0
ddclient on Gitbub
Internet Automated Dynamic DNS Client
INADYN on Gitbub
DDCLIENT configuration file.
A sample DDCLIENT configuration file.
Android Update Clients
Dynamic DNS Update for Android
Dynamic DNS Update